
Hello everyone
Today I am continuing with our article on STAGE 4 & 5 of How to Design An Embroidery Project –
Stitching The Design & instructions.
This is the part I like best – I have my outline traced onto a piece of fabric, it is mounted into a hoop and I have chosen a bunch of thread colours as explained in Stage 3 choosing colours. I skip down to my stitching chair where I have my magnifying lamp and settle down to a couple of hours of stitching. I say a couple of hours – of course life does get in the way – phones ringing, collecting my daughter from school, afternoon activities, shopping for groceries, cooking supper all those things that we all do in our normal day – so the hours are fitted in between times and often late at night.
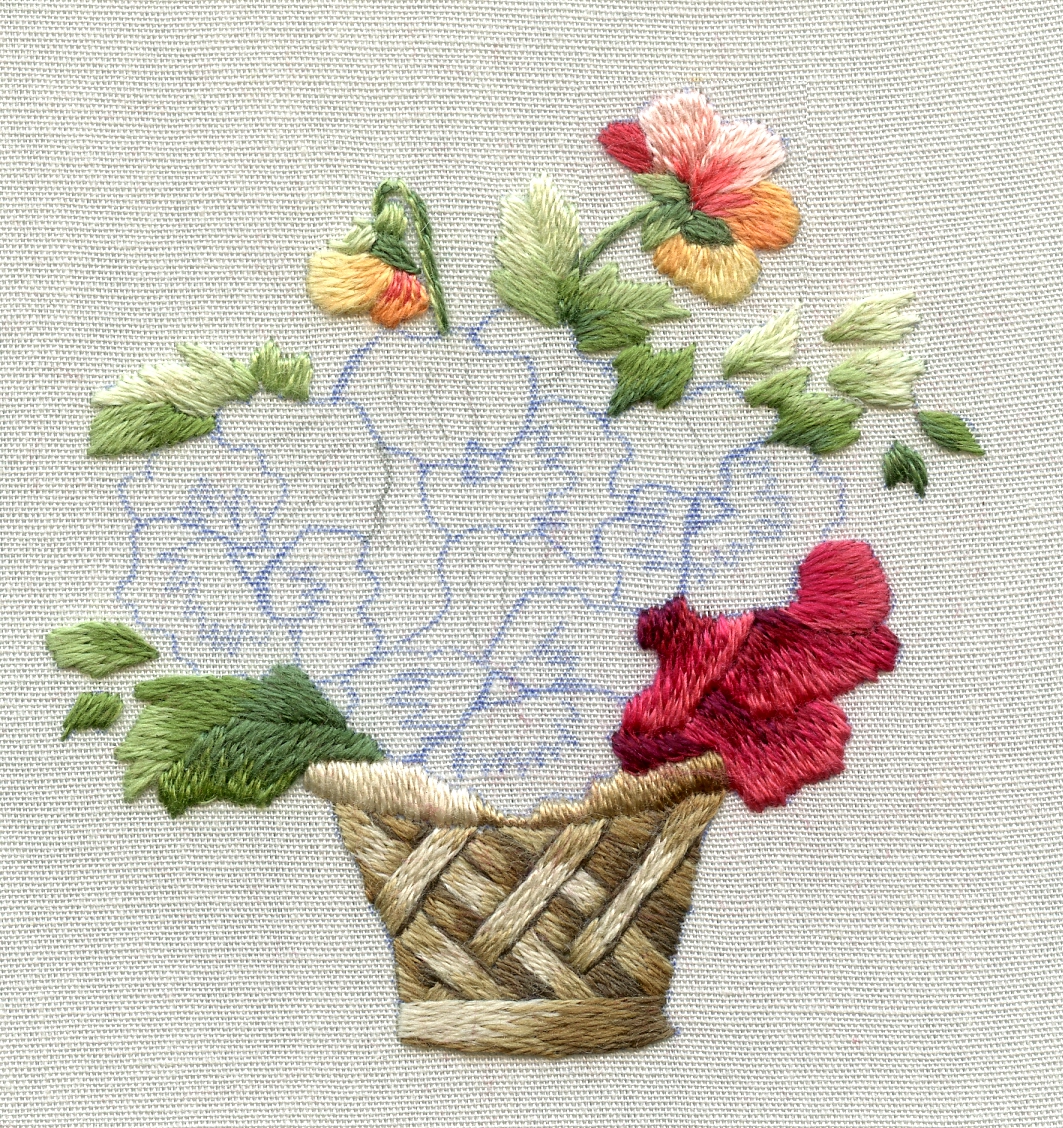
I print out a large and small picture of the image to refer to while I am stitching and staple a picture of the outline onto the back of this – this sits on the arm of my chair and I use it to refer to whilst stitching. I make a note of the colours I use on the outline as shown below so that I can refer back to them when I re-stitch the design with instructions. First time around I choose the colours for each aspect and stitch without interruption as it is very disruptive to have to keep stopping to run upstairs and scan each step. So yes you are right I stitch each design twice sometimes three times if it does not look the way I want it to first time around! It is a treat to sit down and stitch a project without having to do instructions so I revel in the first time around stitching!

When I choose the colours I normally do this under my magnifying lamp which provides a good daylight. Using nature’s daylight is preferable but as I don’t always have the luxury of stitching in the daytime the daylight provided by my lamp is a good substitute and it normally works out ok. While stitching I stop at intervals to hold the embroidery away from me or move into another room and look at it to check that the colours I have chosen are working – if they are not I will substitute shades or unpick and replace. I put the thread shades that I use into a plastic bread basket like the one shown below – it is just the right size and shape, I bought it at our local plastic shop. When I re-stitch the design I can find all the colours I need in my basket.

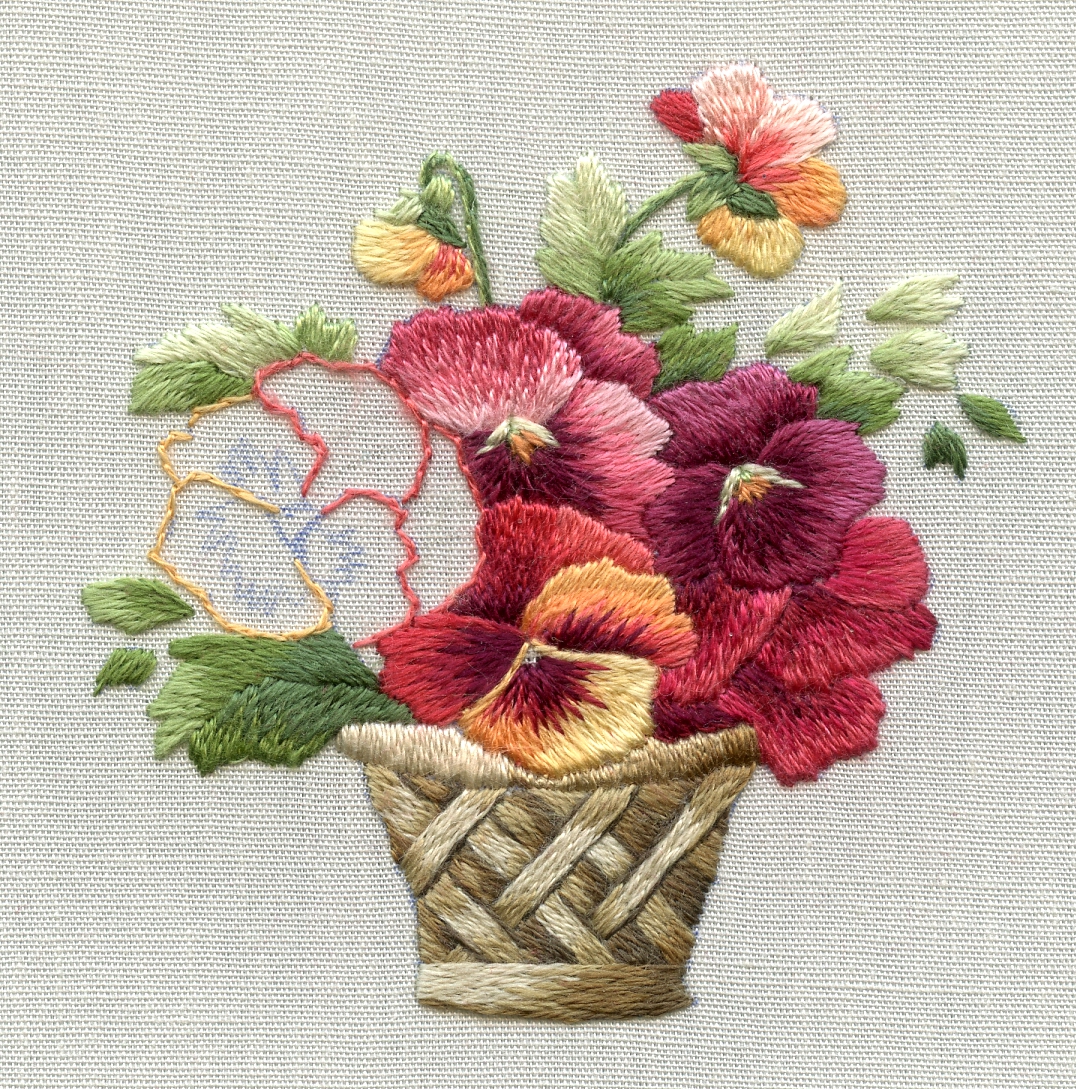
While I am stitching I am making notes of the thread colours I use on my piece of paper – as you can see from my notes it is very messy – I write down shades, scratch them out and put in new ones. Once the stitching is complete and I am happy with the way it looks I start all over again and this time I scan each step as I go along as shown in the photos.

I use Corel Photo Paint to do this – I scan each step at a high resolution about 400 dpi so that if I want to zoom in on details and provide an enlarged detail in the instruction booklet I am able to do this. I use a scanner because the light source is always the same whether it be morning or night and also I can make use of the same settings and size for each step.

The instructions are done in Corel Draw which is compatible with Corel Photo paint so I am able to copy and paste my pics into the booklet template easily. We will talk more about this in the next stage 6 Final publication.
Meanwhile werever you are be it winter, spring or summer have a wonderful week and many happy stitching hours. Trish
Magnificent!!
I’m impressed, I have to admit. Seldom do I come across a blog that’s both educative and entertaining, and without a doubt,
you have hit the nail on the head. The problem is something too few folks
are speaking intelligently about. I’m very happy that I came across this
during my hunt for something concerning this.
Dear Trish Hi I am Sudha from India ,your needle painting work are indeed amazing and wonderful and your has become an inspiration to me to start my needle work which i could not pursue for many years.
Thanks Sudha glad to have been of help:) Trish
Happy Mother’s Day!
That’s a great point about the lighting and size being consistent if you use a scanner rather than a camera. I’ve always alternated, tho now I’m on a slate frame, I don’t think it’ll fit! (biggest one, I aspire to more sizes).
That looks like major work going into working up the notes of the shades. Makes me appreciate what you do all the more.
Thanks Megan and happy Mothers day:)
HAPPY MOTHER’S DAY AND HAPPY STITCHING FROM TEXAS USA
.Hermoso cada puntada es un arte, gracias.
Trish, I so appreciate that you have given us lessons in how to transpose a pic into a beautiful thread painting. I have saved all your lessons so far and want to go back and do more thread painting once I get some of my cross stitch WIPS finished. Your work is amazing and it is because of you that I got hooked on this art form. Thank you again so much!
In Christ,
Gail J.
Thanks Gail, glad it has helped. Trish
%blog_comment%
Dear Trish may be you’ve been told this many times but you’re needle painting is amazing! The three dimensional effect you created for the pansy petals is the work of a master. I can imagine that it would be sooooo easy to mess up with those similar shades if one is inexperienced…………… Looks easy when you do it but i think its very tricky! Appreciate very much that you take the pains to share your talent with us! Happy stitching!
Thanks Rashmi I appreciate your positive feedback always nice to hear:) Trish
Dear Trish, which light is best to use? Where can I buy such a light? I am currently in Cape Town until Sunday visiting family? Is your shop open to buy directly or must we do online shopping only?
Charmaine Mostert
Hi Charmaine Unfortunately I don’t have a shop as such – only an office and online shop here: https://www.etsy.com/shop/TRISHBURREMBROIDERY
You can try Cape Watchmakers they have a good selection of magnifying lamps here: http://www.capewatch.co.za/illuminated-magnifiers
kind regards Trish