
Hello everyone
This week we are going to assemble the mini journal, exciting! In case you missed the original posts for the mini journal you can find all the patterns, instructions for assembly and patterns for cutting out the pages and cover here.
COMPLETED PAGES
By now you should have 12 pages with an embroidered piece on each page – these should have been blocked or pressed and ready for assembly.
STEP ONE – CONSTRUCT COVER
Choose any fabrics you like for the front and back cover and for the spine. I have used a mix and match roses, with co-ordinating stripes and spots as shown. Again you will find the pattern pieces and instructions for cutting out the cover pieces here.


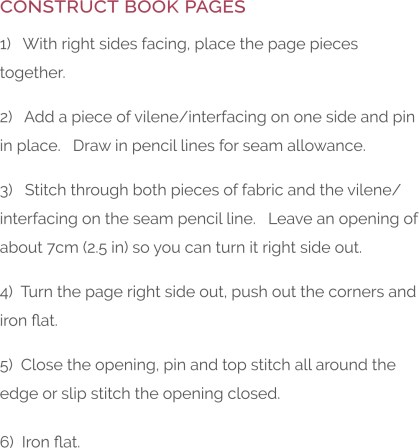
STEP TWO – ASSEMBLE PAGES
You will need to use your embroidered pieces for the pages – again you can find the pattern pieces in the instructions.


STEP THREE – ADD THE PAGES TO INSIDE OF COVER


STEP FOUR – COMPLETION
Fold over the pages of the book , perhaps give it a last press, it is now complete!

SUMMARY
So here is my completed mini journal. My projects may be a little different to yours but that is what makes each one unique? I really love this little journal and will enjoy looking through it from time to time and thinking back on the process.

We started this journal early in 2020 at the start of Covid 19 during the lockdown and it seems quite timely that we have completed it as the year draws to a close? We will look back on our journal creation as bitter sweet. Bitter because it was a challenging year as we found ourselves immersed in a worldwide pandemic with all the related difficulties many have had to face, but sweet in that we were forced to get off the treadmill for a while and turn to our hobbies and crafts to sustain us.
Personally, I feel very humbled by this experience, it has taught me what is important and what is not. It has taught me that we need to be kinder to our environment, to our neighbour and to ourselves, it has taught me to be grateful for what I have and to stop sweating the little things. It has showed me the importance of taking time out of our busy, materialistic way of life to smell the roses occasionally. Hopefully we will emerge from this experience, kinder, more patient and more loving.
I have loved sharing this journal and stitch along with you and hope to continue to inspire and motivate you with new ideas and projects in the future. Thank you as always for your support of my endeavours. Till next time wherever you are in the world, keep smiling and happy stitching!
Trish
This pattern and instructions is absolutely amazing – thank you so much it is exactly what I have been searching high and low for. I already have my linen fabric and patterns I want to start – too excited.
thank you for taking the time to teach this technique to me. I have often wanted to try but needed the inspiration that you gave me to do it. Will remember this time when ever I look at the album
Dianne
Thank you for this generous gift. I’m still working on mine, but it is a delight. I love your new book.
Thank you for sharing your amazing talent. I am moving slowly but I’m enjoying the process. I have your new book and the Christmas tree in Inspirations! This should keep me busy until the end of time!
Have a wonderful Christmas and thank you again.
Patty
Thank you for this wonderful project!
Thank you Trish for the lovely designs. I loved doing this project.
Thank you Gayle it has been a pleasure x
Thank you Trish. I still have four more pages to complete, but now and then I see real progress. One question, please. When a design calls for outlining at the end, do you still outline at the beginning, too. I have tried both ways, but can’t decide if there is an advantage to the beginning outline when there is a hard outline at the end. Could you comment. Thank you for the project and your answer.
Hi Suzanne you only need to add the outlines afterwards otherwise it will be too much like hard work 😂. The only time you need to add outlines beforehand is under your long and short on for example a petal if you want to raise the edge. If in doubt only add outlines afterwards to make it pop! Trish
Thanks!
Loved this project. I have learnt a new type of embroidery and am grateful that you shared your beautiful designs with us.
That’s lovely to hear thank you 😊
I am an elderly person 75+ and I truly enjoy your patterns I also own 3 of your books and they are precious. Thank you for giving us this pun project. Take good care.
France from Canada
It is my pleasure and it’s wonderful to know that you are enjoying your embroidery! Keep going 😊
Thank you. It gave me something to focus on in this strange time.
Thank you too it gave me something to focus on and be useful😊
Thank you so much for this. It is a lovely journey.
My great pleasure Lizzie x